
Troubleshooting Common Issues with Abrasives | Klingspor’s Woodworking Shop
Abrasives loading too quickly (issue)
- Excessive sanding pressure ("white knuckle syndrome" from pushing down on the sander)
- Inadequate or excessive dust extraction (sometimes too much suction on a sander causes it to not extract dust and work the sander harder)
- Excessive speed (Pneumatic Sanders and belts)
- Using Closed Coat on Softwoods. Open Coat abrasives for softwoods and closed for hardwoods.
⇝ It's common in wood sanding to begin with a coarser grit to level out the surface and then move through the grit range to the final desired pass.
Abrasives dulling prematurely (issue)
- Grit too fine (Starting with 150 grit expecting it to perform as well as 80 grit)
- Excessive pressure (Keep the pad flat on the surface. Try not to get "white knuckles")
- Wrong product for application (i.e. Silicon Carbide on bare wood)
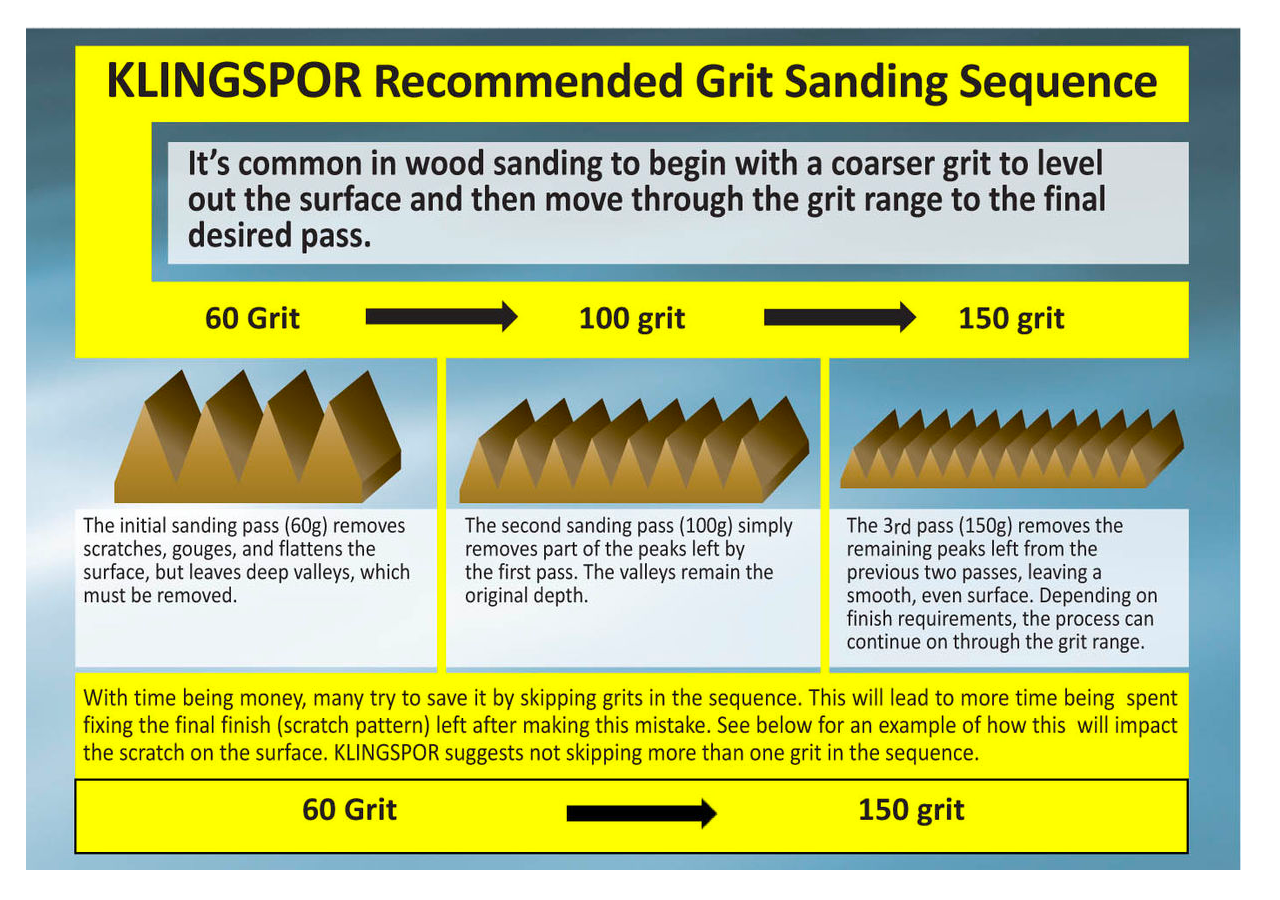
Klingspor Recommended Grit Sanding Sequence for Drum Sanders
60 grit → 100 grit → 150 grit
- The initial sanding pass (60 grit) removes scratches, gouges, and flattens the surface, but leaves deep valleys, which must be removed.
- The second sanding pass (100 grit) simply removes part of the peaks left by the first pass. The valleys remain the original depth.
- The 3rd pass (150 grit) removes the remaining peaks left from the previous two passes, leaving a smooth, even surface. Depending on finish requirements, the process can continue on through the grit range.
⇝ With time being money, many try to save it by skipping grits in the sequence. This will lead to more time being spent fixing the final finish (scratch pattern) left after making this mistake. Klingspor suggests not skipping more than one grit in the sequence.
Streaking of workpiece (issue)
- Sanding pressure is too high
- Dust or debris on the surface of the work piece
- Overloading abrasive due to glue or pitch on the workpiece
- Make sure there is a gap of 1/8" to 1/16" between wraps on a drum sander
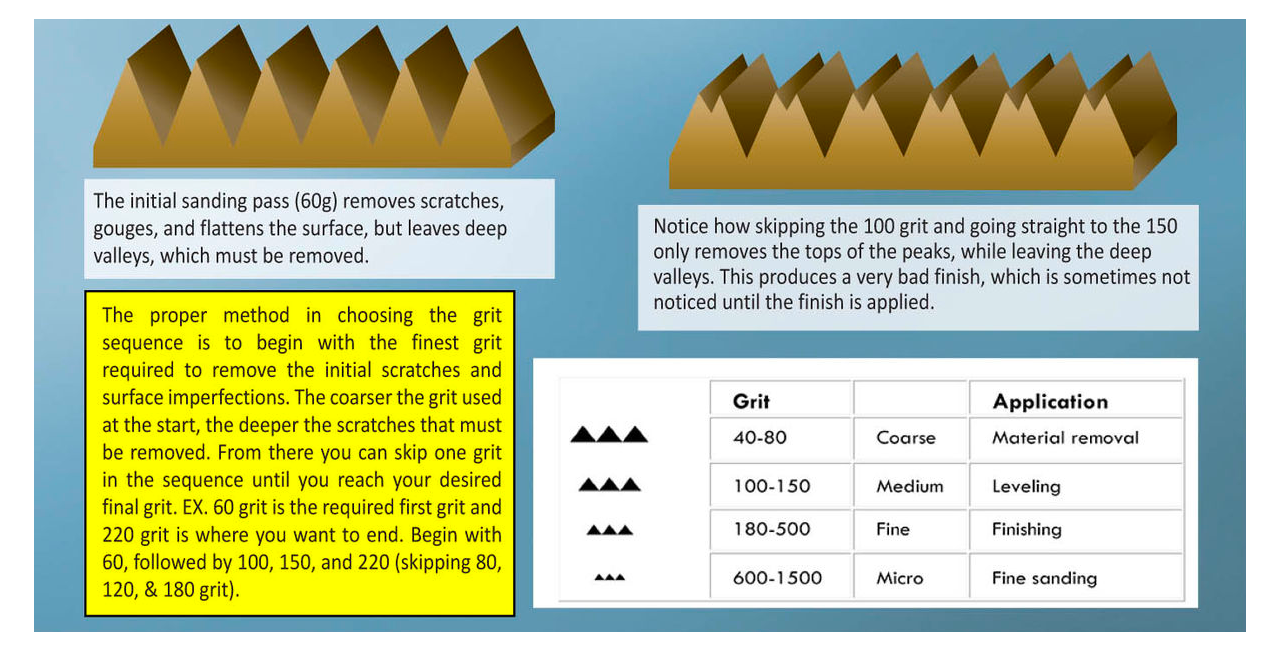
| Grit | Application | |
| 40-80 | Coarse | Material removal |
| 100-150 | Medium | Leveling |
| 180-500 | Fine | Finishing |
| 600-1500 | Micro | Fine sanding |
The proper method in choosing the grit sequence is to begin with the finest grit required to remove the initial scratches and surface imperfections. The coarser the grit used at the start, the deeper the scratches that must be removed. From there you can skip one grit in the sequence until you reach your desired final grit. EX. 60 grit is the required first grit and 220 grit is where you want to end. Begin with 60, followed by 100, 150, and 220 (skipping 80, 120, & 180 grit).
Recent Posts
-

What drum sanding wrap should I use for Douglas Fir?
Hello! I am looking to buy an assortment of grits for my new Powermatic PM2244 drum sander. It takes …Apr 3rd 2026 -

Burning Post #7
Hello Pyrographers! Time to try something new…Burning on Paper!Included in this …Dec 15th 2025 -

Klingspor's 2025 Holiday Gift Blitz: Top Buzzworthy Picks for Woodworkers
December 2025's hottest woodworking gifts are flying off the shelves at Klingspor's. Reddit raves pr …Dec 8th 2025